Category Archives: Nexus One

Nexus One boot before Blackrose install

How to install Blackrose on Nexus One using GNU/Linux

Introduction

Blackrose is a powerful software. It can do a lot of things, but its most useful ability is to resize internal storage. On Nexus One you have to do so in order to install ROMs with greater size as… Ice Cream Sandwich (I’m preparing a guide).

Disclaimer

I AM NOT RESPONSIBLE IF YOU BRICK / RUIN YOUR PHONE IN ANY WAY.
BASIC COMPUTER SKILLS REQUIRED.
PROCEED WITH CAUTION.

Installing is safe, but using Blackrose can wipe out all your data. Proceed at your own risk. Make sure you backup all your data before proceeding.

Prerequisites (my situation)

  • pc with Ubuntu Linux 12.04 64bit
  • adb installed and working
  • USB cable
  • Nexus One data:
    • rooted device (probably not necessary)
    • ClockworkMod recovery installed (probably not necessary)
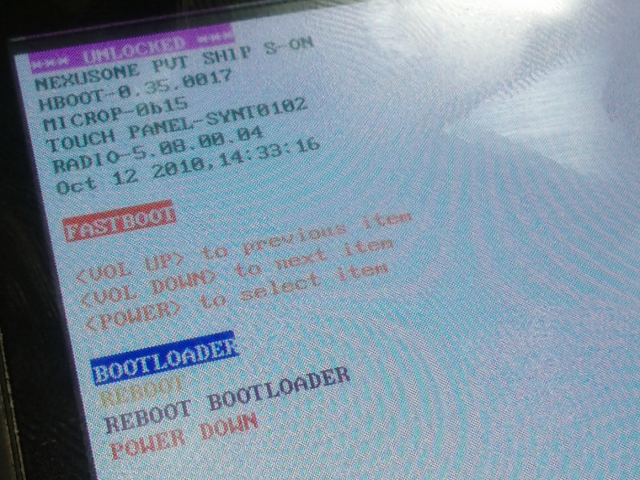
    • unlocked bootloader
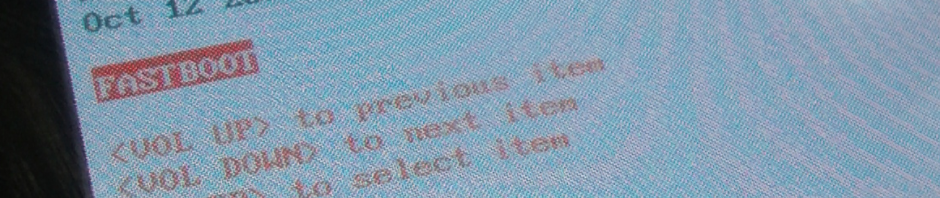
    • HBOOT-0.35.0017 (other hboot are supported, see documentation)
    • RADIO-5.08.00.04
    • S-ON

Needed software

Configure udev

If you get this output, you can skip this section:
$ fastboot devices
HT9CWP81XXXX fastboot

In an Ubuntu environment you cannot access these devices without root user.

If you think it’s annoying (as I do), you can configure udev daemon in order to set appropriate permissions on these device files.

It’s sufficient to create a new udev rule file in /etc/udev/rules.d path:

# cat /etc/udev/rules.d/65-n1.rules
# Nexus One
SUBSYSTEM=="usb", ACTION=="add", \
ENV{ID_MODEL}=="Android_1.0", \
ENV{ID_MODEL_ID}=="0fff", \
ENV{ID_VENDOR}=="htc__Inc", \
MODE="0666"

There is no need to reload any daemon because the rules get reloaded any time a change in rule files occurs.

Step by step guide

  1. phone must be on
  2. phone debug mode must be enabled (check Settings -> Applications -> Development -> USB Debugging)
  3. connect phone to pc with USB cable
  4. unpack archive
    unzip -d blackrose_120421 blackrose_120421.zip
  5. run Blackrose (package contains an executable binary for GNU/Linux)
    cd blackrose_120421
    chmod +x Blackrose
    ./Blackrose

Example output

First use (installation)
-------------------------------
| Nexus One BlackRose 120421 |
| Made by Lecahel(XDA-dla5244) |
| Dok-Do belongs to KOREA |
-------------------------------
Do at your own risk
Don't flash any unsigned radio image
Don't flash eclair rom(eg.EPF30), if you are SLCD Nexus One user
If you are using sense rom, please install HTC Sync and turn off that now
Your N1(USB Debugging ON) should be connected to PC
If your device has already installed latest BlackRose, it will enter into BlackRose menu
Otherwise, BlackRose will be installed or updated automatically
* Waiting for device...
* daemon not running. starting it now *
* daemon started successfully *
* Getting device information...
0 KB/s (2 bytes in 0.040s)
0 KB/s (6 bytes in 0.039s)
0 KB/s (10 bytes in 0.040s)
0 KB/s (1 bytes in 0.040s)
* Installing BlackRose
1707 KB/s (4194304 bytes in 2.399s)
566 KB/s (26172 bytes in 0.045s)
970 KB/s (131072 bytes in 0.131s)
< waiting for device >
sending 'recovery' (4096 KB)... OKAY
writing 'recovery'... OKAY
sending 'hboot' (512 KB)... OKAY
writing 'hboot'... OKAY
rebooting into bootloader... OKAY
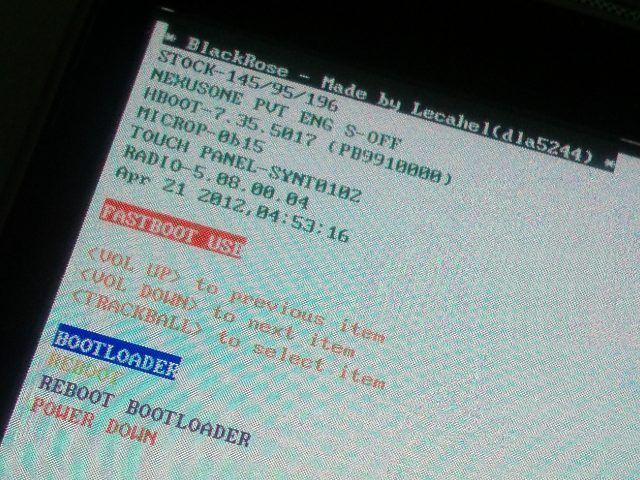
* BlackRose has been successfully installed if your HBOOT changed to 7.35.5017

Then your next execution will be as this:
./Blackrose
-------------------------------
| Nexus One BlackRose 120421 |
| Made by Lecahel(XDA-dla5244) |
| Dok-Do belongs to KOREA |
-------------------------------
1 Apply stock/custom BlackRose
2 Disable HBOOT flashing protect
3 Uninstall BlackRose
4 More information
5 Exit
Please make a decision:

References

HowTo: use Link2sd with Cyanogenmod 7.0.3

Here’s how I got Link2sd working on Nexus One with Cyanogenmod 7.0.3.

Preamble

I tried everything I found on the web (see here for example), but I had no success.

First of all here are the device details I got from “CurveFish DeviceInfo” app:

[System]
Model: Nexus One
Manufacturer: HTC
Device: passion
Product: passion
Brand: google
Bootloader ver.: 0.35.0017
CPI ABI: armeabi-v7a
CPI ABI 2: armeabi
Hardware: mahimahi
Radio: unknown
Kernel Version: 2.6.37.4-cyanogenmod-01332-g7f230e8
shade@toxygene )
#1 PREEMPT Tue Apr 12 12:54:14 EDT 2011
Build Number: GRI40
Release: 2.3.3
SDK: 10

Prerequisites

  • a PC (mine is powered by Ubuntu 11.04 Natty Narwhal)
  • an usb cable for your mobile
  • adb configured and running on the PC (find more info here)
  • a Nexus One set up with Cyanogenmod 7.0.3 ROM
  • Link2sd app installed from Android Market

The problem

If you try to run Link2sd, you’ll receive these outputs:


The exact message is

mount: mounting /dev/block/vold/179:2 on /data/sdext2/ failed: Device or resource busy

Step by step guide

From your pc, connect the phone via adb (I prefer use bash for easy navigation through terminal).
You have to go to the init scripts path and umount /sd-ext/:
$ adb shell
# bash
localhost / # cd /system/etc/init.d
localhost init.d # ls -lAtr
-rwxr-x--- 1 root shell 925 Aug 1 2008 20userinit
-rwxr-x--- 1 root shell 272 Aug 1 2008 06mountdl
-rwxr-x--- 1 root shell 1452 Aug 1 2008 05mountsd
-rwxr-x--- 1 root shell 201 Aug 1 2008 04modules
-rwxr-x--- 1 root shell 229 Aug 1 2008 03firstboot
-rwxr-x--- 1 root shell 27 Aug 1 2008 01sysctl
-rwxr-x--- 1 root shell 365 Aug 1 2008 00banner
localhost init.d # umount /sd-ext/
localhost init.d #

Now run Link2sd from your phone and repeat the procedure:


Exit app, but don’t restart.
It’s time to restore /sd-ext/ on the phone (via adb) and check if we have the new init script from the app:
localhost init.d # mount /dev/block/mmcblk0p2 /sd-ext/
localhost init.d # cd /system/etc/init.d
localhost init.d # ls -lAtr
-rwxr-x--- 1 root shell 925 Aug 1 2008 20userinit
-rwxr-x--- 1 root shell 272 Aug 1 2008 06mountdl
-rwxr-x--- 1 root shell 1452 Aug 1 2008 05mountsd
-rwxr-x--- 1 root shell 201 Aug 1 2008 04modules
-rwxr-x--- 1 root shell 229 Aug 1 2008 03firstboot
-rwxr-x--- 1 root shell 27 Aug 1 2008 01sysctl
-rwxr-x--- 1 root shell 365 Aug 1 2008 00banner
-rwxr-x--- 1 root root 154 Aug 11 16:26 11link2sd
localhost init.d # cat 11link2sd
#!/system/bin/sh
#added by link2sd
sleep 2
mount -t ext2 -o rw /dev/block/vold/179:2 /data/sdext2
mount -t ext2 -o rw /dev/block/mmcblk0p2 /data/sdext2
localhost init.d #

The script has to be modified as here:
#!/system/bin/sh
#added by link2sd
sleep 2
#mount -t ext2 -o rw /dev/block/vold/179:2 /data/sdext2
#mount -t ext2 -o rw /dev/block/mmcblk0p2 /data/sdext2
#
mount -t ext2 -o bind /sd-ext/ /data/sdext2/

Pay attention to the highlighted parts!

For this purpose you can use vi, but first grant read/write permissions to the filesystem:
localhost init.d # mount -o rw,remount /system/
localhost init.d # vi 11link2sd

Verify your work and restore filesystem permissions:
localhost init.d # cat 11link2sd
#!/system/bin/sh
#added by link2sd
sleep 2
#mount -t ext2 -o rw /dev/block/vold/179:2 /data/sdext2
#mount -t ext2 -o rw /dev/block/mmcblk0p2 /data/sdext2
#
mount -t ext2 -o bind /sd-ext/ /data/sdext2/
localhost init.d # mount -o ro,remount /system/
localhost init.d #

Run the script:
localhost init.d # ./11link2sd
localhost init.d #

Verify Link2sd

Choose an application with a widget (in standard Android system, apps with widget cannot be moved to SD).

For this test I used Evernote.
In Link2sd I clicked the “Create link” button.


Now try to use the widget


Done