ICS on Sony Ericsson Xperia X10 Mini Pro!
Let’s be honest: starting from zero it’s a huge process, but it’s possible.
This procedure is a bit complicated and needs some skills.
I can do (and I did) almost everything from GNU/Linux.
Prerequisites (my starting point)
- a full backup done: you’ll lose your phone data
- the phone must run the stock image.
Latest 2.1.1.A.0.6 SE firmware is required for bootloader unlocking procedure.
If you are running an unofficial ROM, you can check my preferred way to restore stock ROM. Firmware 2.1.1.C.0.0 is reported to work, too, but I can’t confirm it - phone must run baseband M76XX-TSNCJOLYM-53404015
- a pc running Ubuntu Linux 12.04 64bit (32bit is reported to work too)
- adb installed and runnable from the pc
- standard USB cable
All needed software
- FlashTool
I used flashtool-0.8.0.0-linux.tar.7z
You can find this tool on its official page http://androxyde.github.com/Flashtool/ - msm7227.7z, see xda forum for download links
- a bash script I wrote to run msm7227 from GNU/Linux. Download here
- kernel image
I used U20_nAa-ics-04_2.6.29.6-nAa-ics-04.ftf
Download links on Google Code official pages. Kernel file names for our device start with “U20” string and they contain “ics” string as well - MiniCM9 ROM
I used MiniCM9-3.0.3-mimmi.zip
Download links on Google Code official pages. Be carefull, we have a device with codename “mimmi” - Google Apps (also known as gapps)
I used gapps-ics-20120317-signed.zip
You can find download links on goo.im official pages. Pick gapps for “ics”
What you’ll get
A super clean phone (no data and crappy bloatware).
One of the most recent mobile operating system: Android Ice Cream Sandwich.
All the goodies provided by CyanogenMod: the ROM I installed is MiniCM9.
Everything working great: camera, wifi etc. (I admit I have to check tethering…).
Disclaimer
BASIC COMPUTER SKILLS REQUIRED.
PROCEED WITH CAUTION.
The instructions are provided only to show how reached my goal.
Please follow them at your own risk. Stop if you are not in my same situation.
Procedure summary
We have basically 3 things to do:
- unlock bootloader
- install custom kernel (suitable for ICS)
- install ICS ROM + Google Apps
Without an unlocked bootloader, you can’t install a custom kernel.
Without a custom kernel, you can’t install ICS.
0. Copy needed files on the phone
As pointed out by Fabian in his comment, it’s safer to copy the files you’ll use at the end of the procedure when your phone is still fully functional.
So, connect the device to your pc, use it as an external storage and copy these files on the sdcard
- MiniCM9-3.0.3-mimmi.zip
- gapps-ics-20120317-signed.zip
1. Unlock bootloader
I presume you’re starting from the very beginning, so I think you have a locked bootloader.
To fix this situation you’ll need some software:
- msm7227.7z
- my script: msm7227_semc.sh
This is the most difficult and dangerous step. The risk is that the phone get bricked. Be careful.
Probably you should read the full story here. There are reported some incompatible situations. If you have never unlocked your bootloader, probably you can go on as I did.
The software you downloaded is written for Windows types of operating systems.
I rewrote the cmd script and made a bash script.
Many kudos to xda forum user “the_laser”, I just translated his work.
You have to follow these steps:
- unpack archive in a new folder
$ 7z x -omsm7227 msm7227.7z - uncompress and copy my script in the same folder
$ mv msm7227_semc.sh msm7227/ - connect the phone to an USB port
- enable debug USB on the phone itself
- run the script
$ cd msm7227/see my output
$ ./msm7227_semc.sh
2. Install custom kernel
You have successfully unlocked your bootloader and now you can now install a custom kernel.
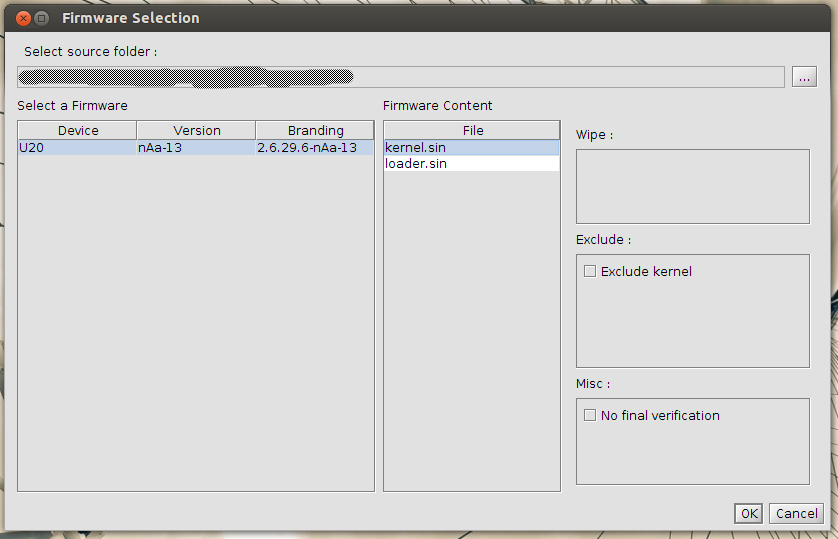
You’ll need flashtool utility and the ftf image file containing the kernel to flash and the recovery software.
- FlashTool
- kernel image file
Follow these steps:
- uncompress and untar flashtool
$ 7z x -oflashtool flashtool-0.8.0.0-linux.tar.7z

$ tar -C flashtool -xf flashtool/FlashTool-0.8.0.0-linux.tar
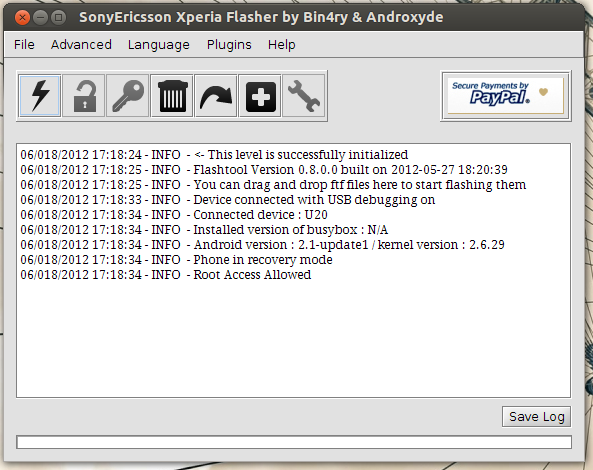
$ rm flashtool/FlashTool-0.8.0.0-linux.tar - launch FlashTool, it’s a java tool with a simple GUI
- drag on the main window the ftf file
- follow the instructions
- at the end the program will tell you that the phone will reboot. It’s not true, so disconnect the USB cable
- wait 5 seconds
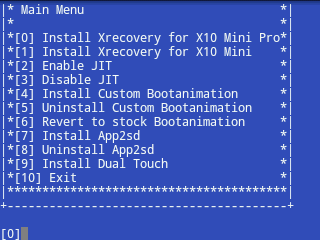
- boot the phone and repeatly push the back button to enter recovery menu.
ClockworkMod must be installed and should come up.
You must see nAa kernel logo.
if CWM menu doesn’t appear you must retry with a reboot (at the moment the phone is unusable)
If you find yourself in troubles, keep in mind that everything can be repaired with a full system restore through SEUS.

3. Install MiniCM9 and the Google Apps
We are almost at the end.
At this time you have an useless phone which cannot even properly boot.
It’s time to flash MiniCM9.
If you followed all steps, you are now in ClockworkMod Recovery menu.

On the step number 0, you should have copied the files on the phone’s SD card. It’s time to use them.
If you skipped that part, you can still do the job via Recovery:
- connect the phone to the pc
- choose “Mounts and Storage”
- choose the last item “mount USB storage”
- copy the files I mentioned
- umount storage from the pc
- choose “umount” from Recovery menu
Follow these steps:
- choose “wipe data/factory reset” than confirm
- choose “wipe cache partition” than confirm
- choose “Advanced” -> “Wipe Dalvik Cache” than confirm
- go back
- choose “install zip from sdcard” -> “choose zip from sdcard” -> find “MiniCM9-3.0.3-mimmi.zip” and confirm
- choose “choose zip from sdcard” -> find “gapps-ics-20120317-signed.zip” and confirm
- go back
- choose “reboot system now”
The first boot can be a little slower. I saw nAa logo, than CyanogenMod boot animation for about 5 mintes, than the first use Android wizard.
Conclusions
If everything went well we reached our goal.
I found that ICS for Xperia X10 Mini Pro is fast and stable.
You can always revert back with a full restore or you can just install a different ROM.