Recently I came across a Stackoverflow question about sample code in Android SDK.
The user was asking how to import code in an Eclipse project.
I’m not using Eclipse in my Android projects so I answered with command line instructions. My development environment is based on vim and bash.
My answer was a bit off topic, but can be useful to someone else.
Let’s presume you want to compile LunarLander sample.
You need to copy the directory recursively to a new path and work on it with the android command: $ cp -r $ANDROID_SDK/samples/android-15/LunarLander .
$ android update project --path LunarLander/ --target 3 --subprojects
$ cd LunarLander/
$ ant debug install
You have to check the targets available to your system with the following command: $ android list targets
Blackrose is a powerful software. It can do a lot of things, but its most useful ability is to resize internal storage. On Nexus One you have to do so in order to install ROMs with greater size as… Ice Cream Sandwich (I’m preparing a guide).
Disclaimer
I AM NOT RESPONSIBLE IF YOU BRICK / RUIN YOUR PHONE IN ANY WAY.
BASIC COMPUTER SKILLS REQUIRED.
PROCEED WITH CAUTION.
Installing is safe, but using Blackrose can wipe out all your data. Proceed at your own risk. Make sure you backup all your data before proceeding.
Prerequisites (my situation)
pc with Ubuntu Linux 12.04 64bit
adb installed and working
USB cable
Nexus One data:
rooted device (probably not necessary)
ClockworkMod recovery installed (probably not necessary)
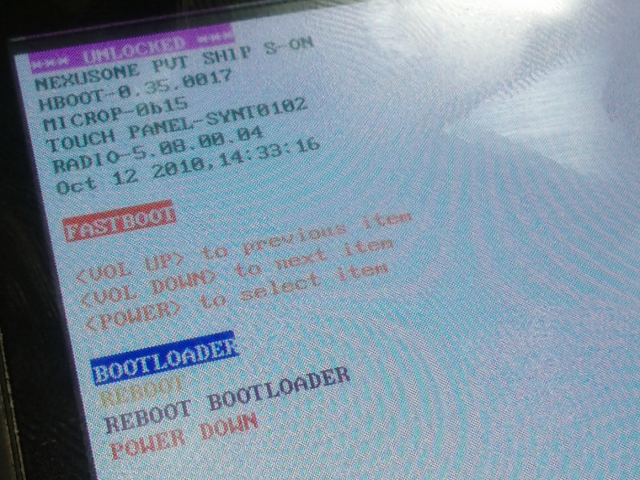
unlocked bootloader
HBOOT-0.35.0017 (other hboot are supported, see documentation)
run Blackrose (package contains an executable binary for GNU/Linux) cd blackrose_120421
chmod +x Blackrose
./Blackrose
Example output
First use (installation) -------------------------------
| Nexus One BlackRose 120421 |
| Made by Lecahel(XDA-dla5244) |
| Dok-Do belongs to KOREA |
-------------------------------
Do at your own risk
Don't flash any unsigned radio image
Don't flash eclair rom(eg.EPF30), if you are SLCD Nexus One user
If you are using sense rom, please install HTC Sync and turn off that now
Your N1(USB Debugging ON) should be connected to PC
If your device has already installed latest BlackRose, it will enter into BlackRose menu
Otherwise, BlackRose will be installed or updated automatically
* Waiting for device...
* daemon not running. starting it now *
* daemon started successfully *
* Getting device information...
0 KB/s (2 bytes in 0.040s)
0 KB/s (6 bytes in 0.039s)
0 KB/s (10 bytes in 0.040s)
0 KB/s (1 bytes in 0.040s)
* Installing BlackRose
1707 KB/s (4194304 bytes in 2.399s)
566 KB/s (26172 bytes in 0.045s)
970 KB/s (131072 bytes in 0.131s)
< waiting for device >
sending 'recovery' (4096 KB)... OKAY
writing 'recovery'... OKAY
sending 'hboot' (512 KB)... OKAY
writing 'hboot'... OKAY
rebooting into bootloader... OKAY
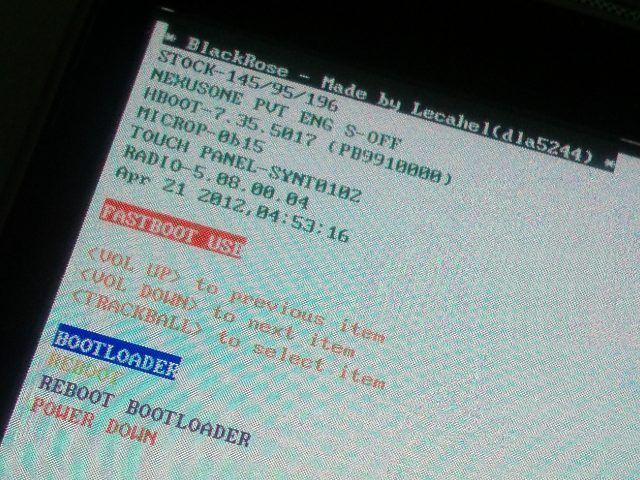
* BlackRose has been successfully installed if your HBOOT changed to 7.35.5017
Then your next execution will be as this: ./Blackrose
-------------------------------
| Nexus One BlackRose 120421 |
| Made by Lecahel(XDA-dla5244) |
| Dok-Do belongs to KOREA |
-------------------------------
1 Apply stock/custom BlackRose
2 Disable HBOOT flashing protect
3 Uninstall BlackRose
4 More information
5 Exit
Please make a decision:
I was connected to a LAN behind a proxy. When I tried to download something from github I got this error: fatal: unable to connect to github.com:
github.com: Name or service not known
I’m running latest Ubuntu desktop (12.04).
One way I found to bypass this problem is to create a git proxy wrapper.
Create the script i.e. ~/bin/git-wrapper.sh and configure the 2 variables according to your needs. My proxy is a local service which forwards my requests to the real LAN proxy. Local service is configured to listen on the 5865 port of my local (127.0.0.1) machine. #!/bin/bash
proxy_address=127.0.0.1
proxy_port=5865
nc -x$proxy_address:$proxy_port -X5 $*
export an environment variable $ export GIT_PROXY_COMMAND=~/bin/git-wrapper.sh
When you download a Raspmc (Raspberry Pi Media Center) image it’s a .zip file.
If you want to check the content of the file you must find a way to mount the image.
Prerequisites
a pc with GNU/Linux
a user with root permissions on the pc
the image you want to analyze (download from the site)
Procedure
first of all unzip the archive$ unzip installer.zip
you’ll notice one file: installer.img that’s an image of a block device:$ file installer.img
installer.img: x86 boot sector; partition 1: ID=0xc, starthead 0, startsector 2048, 131072 sectors; partition 2: ID=0x83, starthead 3, startsector 133120, 251904 sectors, code offset 0xb8
create a mount point$ mkdir /tmp/mnt-installer
if your “file” output gives you less informations, you can examine the image structure (sizes in Sectors) with the following command$ sfdisk -uS -l installer.img
Disk installer.img: cannot get geometry
Disk installer.img: 24 cylinders, 255 heads, 63 sectors/track
Warning: The partition table looks like it was made
for C/H/S=*/4/32 (instead of 24/255/63).
For this listing I'll assume that geometry.
Units = sectors of 512 bytes, counting from 0
Device Boot Start End #sectors Id System
installer.img1 2048 133119 131072 c W95 FAT32 (LBA) installer.img2 133120 385023 251904 83 Linux
installer.img3 0 - 0 0 Empty
installer.img4 0 - 0 0 Empty
take a note of what you want to mount, i.e. img2 (Linux filesystem) as I highlighted
with root permissions, mount the desired partition on the previous created path (133120 is the Start sector taken from the last output)$ sudo mount -o loop,offset=$(( 512 * 133120)) installer.img /tmp/mnt-installer
check the content$ ls -lAtr /tmp/mnt-installer
total 96
drwxr-xr-x 2 root root 4096 Jul 21 2010 selinux
drwxr-xr-x 2 root root 4096 Mar 27 23:44 sys
drwxr-xr-x 2 root root 4096 May 7 17:28 proc
drwxr-xr-x 2 root root 4096 May 7 17:28 mnt
drwxr-xr-x 2 root root 4096 May 7 17:28 home
drwxr-xr-x 2 root root 4096 May 7 17:28 boot
drwx------ 2 root root 16384 Jun 18 02:26 lost+found
drwx------ 2 root root 4096 Jun 18 02:27 root
drwxr-xr-x 2 root root 4096 Jun 18 02:27 srv
drwxr-xr-x 2 root root 4096 Jun 18 02:27 opt
drwxr-xr-x 2 root root 4096 Jun 18 02:27 media
drwxr-xr-x 13 root root 4096 Jun 18 02:27 var
drwxr-xr-x 10 root root 4096 Jun 18 02:27 usr
drwxrwxrwt 2 root root 4096 Jun 18 02:27 tmp
drwxr-xr-x 2 root root 4096 Jun 18 02:31 sbin
drwxr-xr-x 9 root root 12288 Jun 18 02:31 lib
drwxr-xr-x 43 root root 4096 Jun 18 02:31 etc
drwxr-xr-x 2 root root 4096 Jun 18 02:31 bin
drwxr-xr-x 4 root root 4096 Jun 18 02:31 dev
when you have done, unmount the filesystem$ sudo umount /tmp/mnt-installer
By continuing to use the site, you agree to the use of cookies. more information
The cookie settings on this website are set to "allow cookies" to give you the best browsing experience possible. If you continue to use this website without changing your cookie settings or you click "Accept" below then you are consenting to this.