Tag Archives: tip

Raspberry Pi tip: you can use your old CRT TV as a monitor

Maybe you don’t know, but you can use an old CRT TV as a monitor for the Raspberry Pi.
Find a SCART and some cables for audio and video and you are done.

You need:

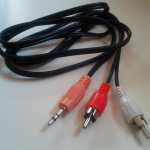
  1. a cable for the video: it’s a cable with the same type of audio/video plug in each end. The standard color is yellow.
  2. a cable for the audio: in this case you must have an end with a 3.5mm stereo audio plug and the other one with 2 audio/video plugs. The standard colors are red and white.
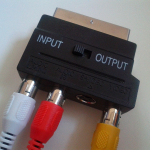
  3. a SCART adapter suitable for input with audio/video

Than you have to connect the cables as you can easily imagine.
The only thing to keep in mind is to set the SCART adapter to “INPUT”:

The trick does not need any additional work if you use a NTSC TV.

If you are in Europe and you use PAL systems (like me), you must create a config file in the /boot/ path of the Raspberry Pi while it’s running and configure the appropriate parameter.
vi /boot/config.txt
# Set stdv mode to PAL (as used in Europe)
sdtv_mode=2
#
overscan_left=20
overscan_right=20
overscan_top=20
overscan_bottom=20

Overscan parameters allow you to set a proper margin if you see that the image is not centered.

The end.

Raspberry Pi Debian tip: enable ssh on boot

That’s an extremely easy tip.

I own a Raspberry Pi, but I haven’t a HDMI enabled TV, so I thought I couldn’t see any output from the system.

Stock Debian image doesn’t start ssh daemon on boot, but as you can see on the SD card, there’s a file named “boot_enable_ssh.rc”.

You should rename that file in “boot.rc”, and start everything. That’s all.

Now you must know that if you haven’t a HDMI enabled TV or monitor, you can still use Video OUT and an old CRT TV to see what’s going on. See my future tip.

Raspberry Pi tip: resize your sd card

When you download an image for Raspberry Pi from internet (Debian image for example), the size is quite often 2GB.

In my case I’ve always SD cards of 8GB of size. After writing the image to the SD, 6GB of space get lost.

Here’s what I did to resize my Raspberry Pi Debian system without loosing its functionality.

Prerequisites

  • a sd card with Debian for Raspberry Pi installed (or similar)
  • a pc powered by Ubuntu Linux
  • GParted installed

Identify SD card

Plug your card reader and take a look to system messages with “dmesg”:
$ dmesg
[22006.536054] usb 1-1: new high-speed USB device number 3 using ehci_hcd
[22006.736355] usb-storage 1-1:1.0: Quirks match for vid 090c pid 6000: 100000
[22006.738687] scsi15 : usb-storage 1-1:1.0
[22007.737879] scsi 15:0:0:0: Direct-Access Generic 6000 PQ: 0 ANSI: 0 CCS
[22007.739762] sd 15:0:0:0: Attached scsi generic sg3 type 0
[22007.744742] sd 15:0:0:0: [sdc] 16659456 512-byte logical blocks: (8.52 GB/7.94 GiB)
[22007.745494] sd 15:0:0:0: [sdc] Write Protect is off
[22007.745500] sd 15:0:0:0: [sdc] Mode Sense: 4b 00 00 08
[22007.746235] sd 15:0:0:0: [sdc] No Caching mode page present
[22007.746240] sd 15:0:0:0: [sdc] Assuming drive cache: write through
[22007.750365] sd 15:0:0:0: [sdc] No Caching mode page present
[22007.750372] sd 15:0:0:0: [sdc] Assuming drive cache: write through
[22007.757039] sdc: sdc1 sdc2
[22007.760977] sd 15:0:0:0: [sdc] No Caching mode page present
[22007.760984] sd 15:0:0:0: [sdc] Assuming drive cache: write through
[22007.760989] sd 15:0:0:0: [sdc] Attached SCSI removable disk

In my case the SD is /dev/sdc.

Start GParted

Choose the right device with the top right selector:

Proceed with these steps:

  1. right click on all the partitions and umount them all
  2. move the swap partition to the very end of the sd (right side of the bar)
  3. resize the ext4 partition (sdc2)
  4. commit the changes

On my pc it took 2 minutes.

You’re done.

Android tip: Launch app through adb shell

Please note than I’m using CyanogenMod 7.

First of all you have to know the Intent and Activity of your interest.

The best way to find them I found is to use logcat.

Open a shell

adb shell

Start logcat filtering the needed rows:

logcat | grep 'Starting:'

Start the app you want to launch later in the standard way (use your phone launcher icon).

Take a look to the lines which come from logcat (i.e. launching Shazam):

I/ActivityManager( 205): Starting: Intent { act=android.intent.action.MAIN cat=[android.intent.category.LAUNCHER] flg=0x10000000 pkg=com.shazam.encore.androidd cmp=com.shazam.encore.android/com.shazam.android.Splash bnds=[365,244][475,362] } from pid 305 I/ActivityManager( 205): Starting: Intent { act=android.intent.action.VIEW flg=0x4000000 cmp=com.shazam.encore.android/com.shazam.android.Home (has extras) } from pid 8096

Now start the app via am:

localhost / # am start -a android.intent.action.MAIN -n com.shazam.encore.android/com.shazam.android.Splash

Look at your phone.

Now you can combine all in one single command:

adb shell 'am start -a android.intent.action.MAIN -n com.shazam.encore.android/com.shazam.android.Splash'

Done.