Category Archives: Hardware

How to Install Tasmota on Shelly 1 from Linux

This guide will show you how to flash Tasmota firmware onto a Shelly 1 device using Linux. You will use the PlatformIO toolchain to communicate with the device, erase the existing firmware, and install the Tasmota firmware via serial communication. After flashing, you’ll configure the device to connect to your Wi-Fi and MQTT broker.

Prerequisites

  1. Linux PC
  2. Shelly 1 device
  3. USB to Serial adapter (e.g., FTDI adapter)
  4. Jumper wires to connect the Shelly 1 to the USB-to-serial adapter
  5. Tasmota binary downloaded to your local machine

Make sure that PlatformIO and Python 3 are installed on your system.

Step 1: Install PlatformIO

If you don’t already have PlatformIO installed, you can install it via Python’s package manager pip:

pip install platformio

This installs the platformio command-line interface (CLI), which will be used to flash the firmware onto the Shelly 1.

Step 2: Connect Shelly 1 to Your Linux PC

  1. Disconnect Shelly 1 from mains power to avoid electric shock.
  2. Connect the TX, RX, GND, and VCC pins of the Shelly 1 to the corresponding pins of your USB-to-serial adapter (TX->RX, RX->TX, GND->GND, VCC->3.3V). GPIO0 has to be temporary connected to GND to enter programming mode.
  3. Plug the USB-to-serial adapter into your Linux PC.
  4. You can now disconnect GPIO0 from GND or leave it as is.

Step 3: Test Communication with the Device

Before proceeding with the flashing, test whether your Linux PC can communicate with the Shelly 1 via serial.

Run the following command to check communication (replace /dev/ttyUSB0 with your actual serial device if needed):

python3 ~/.platformio/packages/tool-esptoolpy/esptool.py -p /dev/ttyUSB0 flash_id

If the communication is successful, you should see information about the connected ESP8266 chip inside the Shelly 1.

Step 4: Erase the Flash Memory

You have to reconnect the device to the pc as seen in Step 2.

Next, you need to erase the existing firmware on the device to ensure a clean installation of Tasmota. To erase the flash memory, run the following command:

python3 ~/.platformio/packages/tool-esptoolpy/esptool.py -p /dev/ttyUSB0 erase_flash

This process clears the current firmware from the Shelly 1.

Step 5: Flash Tasmota Firmware

You have to reconnect the device to the pc as seen in Step 2.

Once the flash memory is erased, you can now flash the Tasmota firmware onto the device. Replace the path ~/Downloads/tasmota.bin with the actual path to your downloaded Tasmota binary file:

python3 ~/.platformio/packages/tool-esptoolpy/esptool.py -p /dev/ttyUSB0 write_flash -fm dout 0x0 ~/Downloads/tasmota.bin

This writes the Tasmota firmware onto the Shelly 1.

Step 6: Configure the Device via Serial

After flashing, you can configure the Shelly 1 via serial connection using picocom. If it’s not installed on your system, you can install it with:

sudo apt install picocom

To open a serial connection, run:

picocom --echo --omap crcrlf --baud 115200 /dev/ttyUSB0

Once connected, you will see the device’s output. You can now paste the following configuration string to set up Wi-Fi and MQTT parameters:

Backlog ssid1 YourSSID; password1 veryStrongWiFiPassword; MqttHost 192.168.1.200; Template {"NAME":"Shelly 1","GPIO":[1,1,0,1,224,192,0,0,0,0,0,0,0,0],"FLAG":0,"BASE":46};

Parameters in the Configuration String:

  • ssid1: Replace YourSSID with the name of your Wi-Fi network.
  • password1: Replace veryStrongWiFiPassword with your Wi-Fi password.
  • MqttHost: Set this to the IP address of your MQTT broker (e.g., 192.168.1.200).
  • Template: This defines the GPIO pin mapping for the Shelly 1.

Step 7: Verify the Device Connection

Once the Shelly 1 reboots, it should connect to your Wi-Fi and MQTT broker based on the configuration provided. You can now control it via the MQTT interface or the Tasmota web interface.


Congratulations! You have successfully flashed and configured Tasmota on your Shelly 1 device from Linux.
Tolino Shine 3 – upgrade if you have installed TWRP

If have installed TWRP and you want to upgrate to the latest firmware using the official procedure, you have to restore the original recovery.img.

  1. shutdown the device
  2. on the pc extract recovery.img from the update.zip file which contains your current firmware.

    tolino-15.3.0$ unzip update.zip recovery.img
    
  3. on the pc run the flash command and keep it waiting

    $ fastboot flash recovery recovery.img 
    < waiting for any device >
    
  4. (enter fastboot mode) keep pressed the power up button on the device while inserting the USB cable and in about 25 seconds you should see

    Sending 'recovery' (6474 KB)                       OKAY [  0.245s]
    Writing 'recovery'                                 OKAY [  0.906s]
    Finished. Total time: 1.170s
    
  5. reboot the device and now you should be able to upgrade it with the standard procedure

Tolino Shine 3 – 15.3.0 update

Good news

The adbd binary is the same of 14.1.0:

$ md5sum tolino-1*/ramdisk/sbin/adbd
1d23e203eba05102e6cb642a117b8d64  tolino-14.1.0/ramdisk/sbin/adbd
1d23e203eba05102e6cb642a117b8d64  tolino-15.3.0/ramdisk/sbin/adbd

The direct download link for the new Shine 3 firmware is https://tolinodownload-a.akamaihd.net/ereader/15.3.0/OS44/update.zip.

As a sidenote, you can find the latest Tolino updates on the Tolino website.

Everything documented is still relevant

Tolino Shine 3: patch adbd to run as root

References

TL;TR

  1. install prerequisites
  2. create the script nop.sh
  3. extract adbd from initial ramdisk
  4. patch adbd

    ./nop.sh adbd "4f f4 fa 60 0e f0 86 ed 00 28 df d1 4f f4 fa 60 16 f0 47 f8 00 28 d9 d1" && \
        cat adbd.patched > adbd && rm adbd.patched 
    ./nop.sh adbd '0e f0 de ed' && \
        cat adbd.patched > adbd && rm adbd.patched
    
  5. recreate boot.img

  6. test and flash via fastboot

Prerequisites

  1. I’m working on Ubuntu 21.10, so I’ve to install these packages

    apt install abootimg openjdk-11-jdk
    
  2. We are going to patch a binary file, so we have to use a disassembler: Ghidra

Procedure

Extract the adbd binary from Tolino firmware update file

  1. download the right version of your update (for me it’s currently 14.1.0)

    wget https://download.pageplace.de/ereader/14.1.0/alldevices/update.zip
    

    (as a sidenote, you can find the latest tolino update on the Tolino website)

  2. extract boot.img

    unzip update.zip boot.img
    
  3. unpack boot.img (we need the initial ramdisk initrd.img)

    abootimg -x boot.img
    
  4. extract the ramdisk in a directory

    mkdir ramdisk
    zcat initrd.img | ( cd ramdisk/ && cpio -imd )
    

You’ll find adbd in this path ramdisk/sbin/adbd.

Setup disassembler (Ghidra)

  1. open Ghidra and select File, New Project..., Next, choose a directory for the project and give it a name

  2. click on CodeBrowser (it’s a green dragon) ghidra code browser

  3. File, Import File... and navigate in the previous ramdisk/ folder, under ramdisk/sbin/ and choose adbd

  4. go on and select all the possible analysis checkboxes, then Analyze

Find all the interesting functions

When the Tolino starts adbd is not activated. We can enable it, (following these steps), but it will run under uid=2000 and git=2000 (no root).

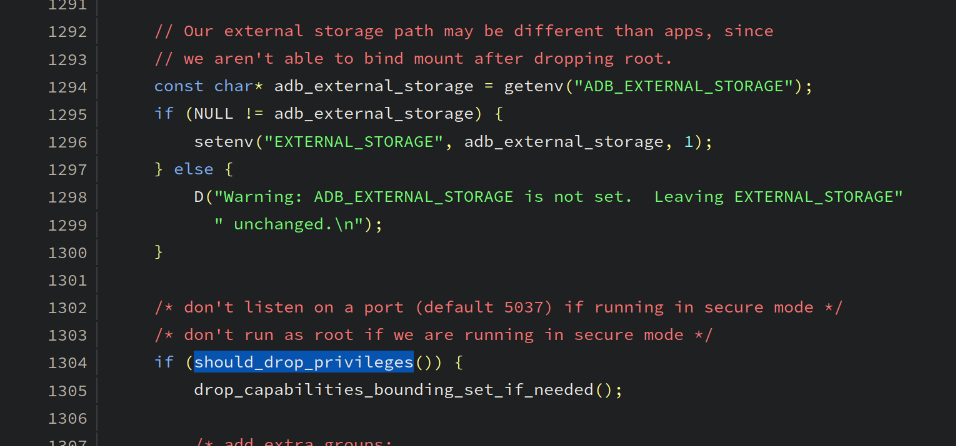
If you inspect the source code, you’ll see that there are some references to functions related to users/groups/capabilities:

  • setuid(2000)
  • setgid(2000)
  • prctl(PR_CAPBSET_DROP, ...)

We need to inhibit those calls.

Patch setuid and setgid

The first 2 functions are called as shown below (AID_SHELL is 2000, full code here):

    gid_t groups[] = { AID_ADB, AID_LOG, AID_INPUT, AID_INET, AID_GRAPHICS,
                       AID_NET_BT, AID_NET_BT_ADMIN, AID_SDCARD_R, AID_SDCARD_RW,
                       AID_MOUNT, AID_NET_BW_STATS };
    if (setgroups(sizeof(groups)/sizeof(groups[0]), groups) != 0) {
        exit(1);
    }
    /* then switch user and group to "shell" */
    if (setgid(AID_SHELL) != 0) {
        exit(1);
    }
    if (setuid(AID_SHELL) != 0) {
        exit(1);
    }
    D("Local port disabled\n");

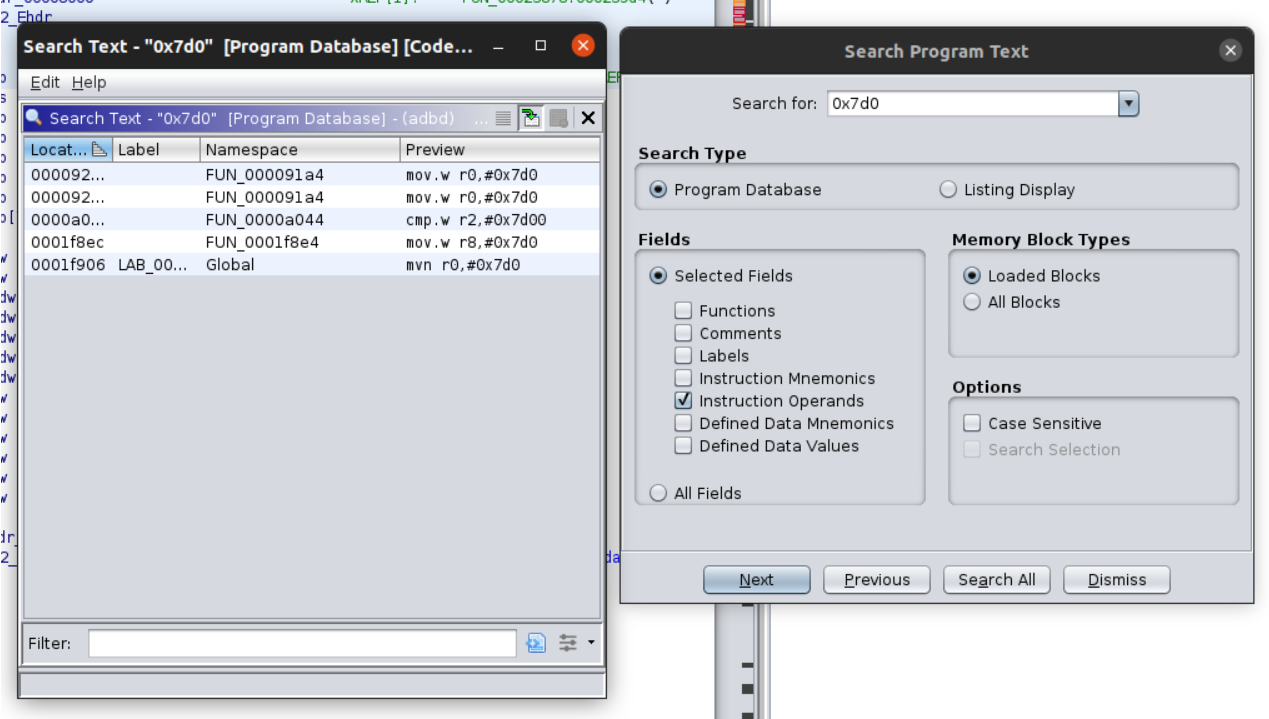
Under Ghidra search for 0x7d0 (200010) using Search, Program Text. Choose Instruction Operands and Search All. You should see something like this ghidra search 0x7d0

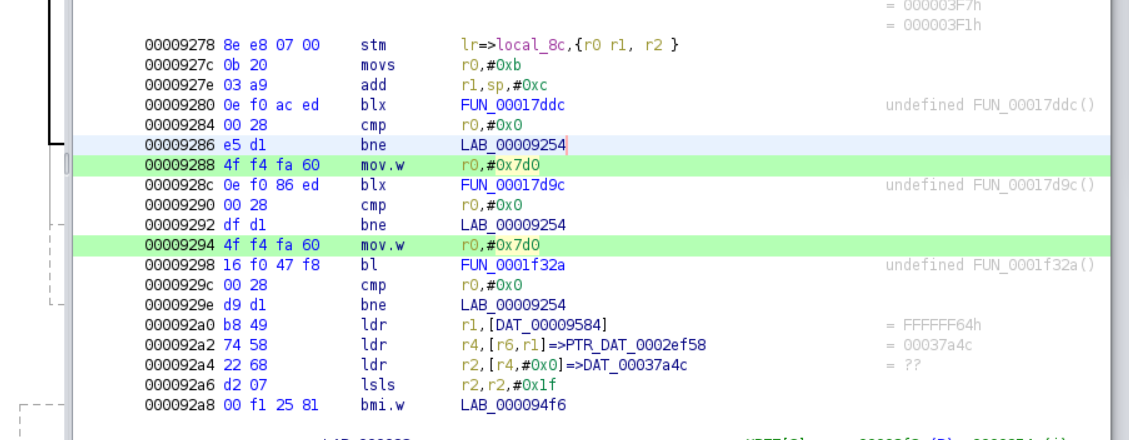
The first 2 occurences are near each other. Here’s in the code browser ghidra searched lines

We can translate it as

So it would be great to replace all the highlighted part with nop (no operation instruction in assembler).

I created this simple script just to do it (nop.sh):

#!/bin/bash

set -e

if [[ $# -ne 2 ]]; then
    echo "Usage:"
    echo "  $(basename "$0") <file> <hex string>"
    exit 1
fi
input="$1"
hex="$(tr -d ' :' <<< "$2")"
output="$input.patched"

# build a nop string, the same size of "hex"
nops="$(printf "%*s" $(( ${#hex} / 4)) '' | sed 's: :00bf:g')"

# patch and rebuild binary
xxd -ps "$input" | tr -d '\n' | sed "s:$hex:$nops:g" | xxd -r -p > "$output"

# confirm substitution
[[ $(md5sum <"$input") != "$(md5sum <"$output")" ]] || { echo "$(basename "$0"): [WARNING] nothing done" >&2; exit 2; }

# check file size
[[ $(stat -c%s "$input") = $(stat -c%s "$output") ]] || { echo "$(basename "$0"): [ERROR] size mismatch" >&2; exit 3; }

echo "$output done"

Open the binary view under Windows, Bytes and select the block of code. In the Bytes window copy the highlighted bytes and do this

./nop.sh adbd "4f f4 fa 60 0e f0 86 ed 00 28 df d1 4f f4 fa 60 16 f0 47 f8 00 28 d9 d1"
cat adbd.patched > adbd
rm adbd.patched 

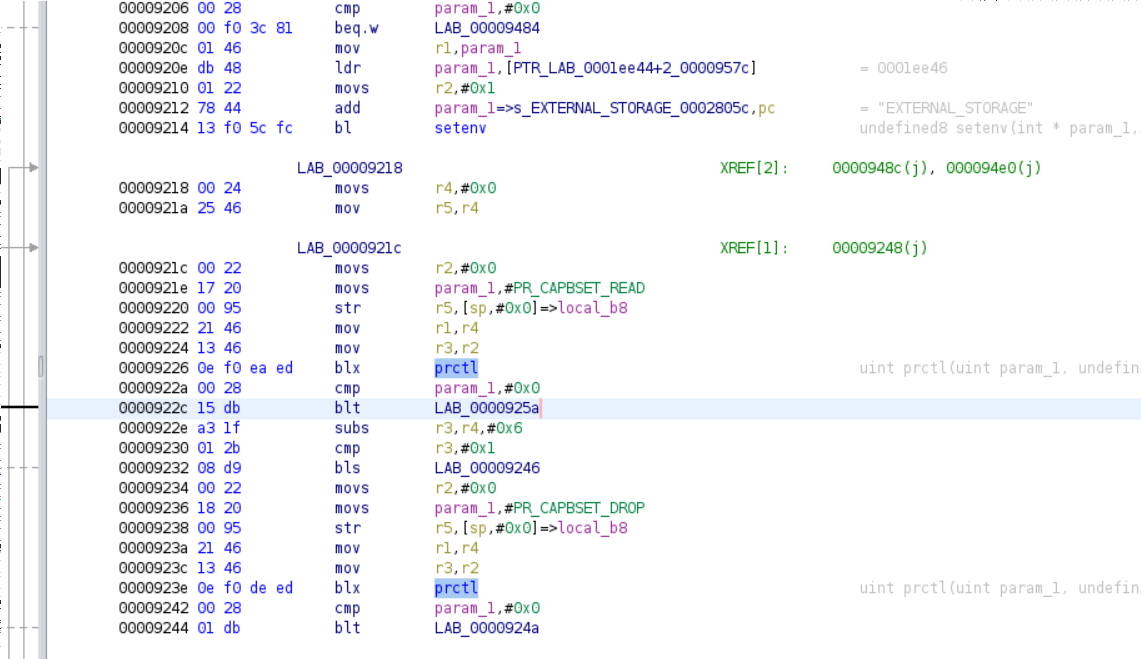
Patch prctl(PR_CAPBSET_DROP, ...)

Then we have to remove prctl(PR_CAPBSET_DROP, ...).

The code is right after ADB_EXTERNAL_STORAGE

Translated to

It’s sufficient to remove the call 0e f0 de ed

./nop.sh adbd '0e f0 de ed'
cat adbd.patched > adbd
rm adbd.patched

This adbd will run with root privileges, but we have to set up the boot.img accordingly. Copy the file as shown and follow these steps.

cp adbd /tmp/adbd.patched
Tolino Shine 3

Tolino Shine 3: use adb as root

These are the steps I took to get:

$ adb shell
root@ntx_6sl:/ # id
uid=0(root) gid=0(root) groups=1003(graphics),1004(input),1007(log),1009(mount),1011(adb),1015(sdcard_rw),1028(sdcard_r),3001(net_bt_admin),3002(net_bt),3003(inet),3006(net_bw_stats)

Disclaimer

I am not responsible if you brick / ruin your device in any way. Basic computer skills required. Proceed with caution. I cannot be held responsible if anything goes wrong.

Prerequisites

  1. We need a patched adbd which runs as root in /tmp/adbd.patched, so follow these steps.

  2. I’m working on Ubuntu 21.10 so I’ve to install this package

    sudo apt install abootimg
    
  3. It could be a good idea to have a full backup.

Procedure

  1. download the right version of your update (for me it’s currently 14.1.0)

    wget https://download.pageplace.de/ereader/14.1.0/alldevices/update.zip
    

    (as a sidenote, you can find the latest tolino update on the Tolino website)

  2. extract boot.img

    unzip update.zip boot.img
    
  3. unpack boot.img (we need the initial ramdisk initrd.img)

    abootimg -x boot.img
    
  4. extract the ramdisk in a directory

    mkdir ramdisk
    zcat initrd.img | ( cd ramdisk/ && cpio -imd )
    
  5. modify the ramdisk to enable debug mode, disable secure modes, enable mtp and adb

    cd ramdisk/
    sed -i 's:^ro.secure=1$:ro.secure=0:' default.prop
    sed -i 's:^ro.debuggable=.*$:ro.debuggable=1:' default.prop
    sed -i 's:^persist.sys.usb.config=mass_storage$:persist.sys.usb.config=mtp,adb:' default.prop
    sed -i 's:setprop ro.adb.secure 1:setprop ro.adb.secure 0:' init.rc
    
  6. replace adbd with a patched one which runs with root privileges (let’s suppose it’s in /tmp/adbd.patched, see here)

    cat /tmp/adbd.patched > sbin/adbd
    
  7. recreate the initrd.img

    # we're still working in ramdisk/ directory
    find . ! -name . | LC_ALL="C" sort | cpio -o -H newc -R +0:+0 | gzip -c > ../initrd.img
    cd ..
    
  8. replace the old initrd.img inside boot.img

    abootimg -u boot.img -r initrd.img
    
  9. safely temporarily test the new boot.img, type on the pc

    fastboot boot boot.img
    
  10. reboot Tolino in fastboot mode, this will temporarily boot the new boot.img

  11. test on the pc if adb is running in privileged mode, you should see

    $ adb shell
    root@ntx_6sl:/ # id
    uid=0(root) gid=0(root) groups=1003(graphics),1004(input),1007(log),1009(mount),1011(adb),1015(sdcard_rw),1028(sdcard_r),3001(net_bt_admin),3002(net_bt),3003(inet),3006(net_bw_stats)
    
  12. permanently flash the new boot.img, type on the pc

    fastboot flash boot boot.img
    
  13. reboot Tolino in fastboot mode and you shoud see

    $ fastboot flash boot boot.img
    < waiting for any device >
    Sending 'boot' (4376 KB)                           OKAY [  0.146s]
    Writing 'boot'                                     OKAY [  0.437s]
    Finished. Total time: 0.601s
    
  14. after flashing, reboot

    fastboot reboot